
Before school let out, I saw endless fairy and gnome displays at, what seemed liked, every store I went into. I have never had a interest in fairies and gnomes before, but the end caps filled with figures, houses, and accessories got me interested and allowed my imagination to soar. I decided that I wanted to put, "Create a Fairy Garden" on MY Summer Bucket List. Lol! Seriously. MINE, not Lilah's, not Jax's, not Tyson's...MINE. Is this a potential midlife crisis in the workings? However, If anyone wanted to join me, they were welcome to/too. This week, my boys are at GMS basketball camp and that has left Lilah and I the gift of spending some quality time together. We chose to start out our first boy-free day shopping for our fairy garden needs and wants. We traveled all over town, from A.C. Moore, to JoAnn Fabrics, to the Dollar Tree, and to Michael's Craft Stores. We also stopped by McCallister's for an unsweetened iced tea and Bubblecake, so Liley could get a cupcake. Here are the items we collected on our shopping endeavor.

I didn't have a list of supplies with me. I just knew that I wanted our Fairy Garden to be vibrant/colorful, somewhat "alive", creative, dreamy, and remain outdoors. I allowed Lilah to pick all of the items out. It was definitely HARD to relinquish that control because there were so many adorable homes and accent pieces that I fell in love with, but I wanted her to feel involved. I actually love everything she picked out. I did try to suggest a different house, that was more realistic looking, but she was really interested in the mushroom top house. Here's what we purchased from top left to top right:
1. A Fairy/Gnome Home. This home was purchased at JoAnn Fabrics. They had a ton of really adorable and realistic homes. Some were made out of straw, others porcelain. Some had moss growing all over them and others were just painted. Originally $29.99, on sale for $17.99
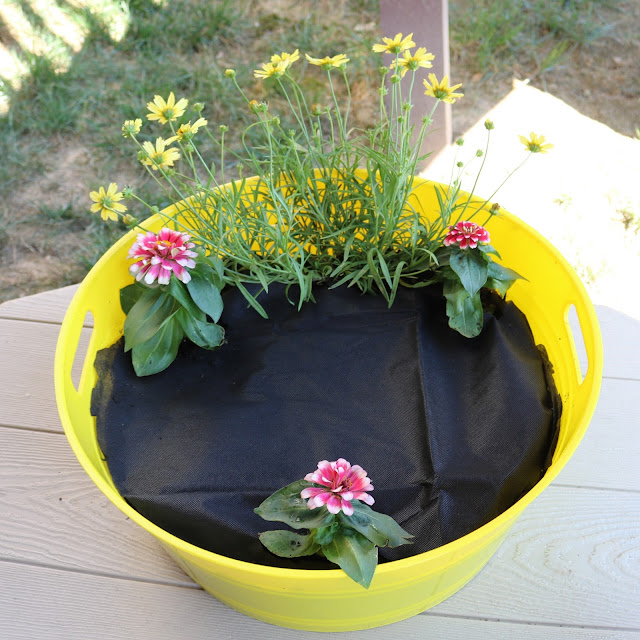
2. A Container and Potting Soil: I had the hardest time finding an container. I originally wanted a bird bath or a old wheel barrel, but Lilah was getting ANXIOUS to assemble our garden and my time was running out. Bird baths were either too small or too pricey in my opinion ($40). We were finding the right size containers, but Lilah felt they "weren't pretty". "It has to be pretty mom!" We ended up getting a bright, yellow, plastic tub from Big Lots. The potting soil came from Lowes Home Improvement. I purchased the largest bag they had.
3. Colorful Rocks/Pebbles: We were planning on creating a walk-way for our fairy and gnomes, so when we spotted these colorful rocks at Lowes, in the gardening section, we had to snag them.
4. Gnome: This camera man gnome was spotted at A.C. Moore. We fell in love with him the MOMENT we saw him.
5. Ducks: We knew we wanted a section, in our garden, with a pond or water, so we had to have these ducks. We purchased them at A.C. Moore.
6. Gnome: This cute little gnome, sitting on a frog, was purchased at Michael's Crafts. Michael's had a large selection of fairy and gnome garden supplies, back in May, but it was slim pickings on Monday.
7. Floral Bench: I found this darling bench at Michael's before school let out. I bought it for Lilah, and put it in her "Welcome Summer" bucket. It was the first piece that we bought, but certainly NOT the last.
8. Weed Barrier: I found this weed barrier at the Dollar Tree, of all places. LOVE that store. I wanted live plants in our fairy/gnome garden, so I thought, for a $1.00, I'll grab it! If we use it great, if not, it was $1.00. Basically, after planting your live plants, you use the weed barrier before places down your moss or mulch. It stops weeds from growing through the moss/mulch. I don't our few potted plants could even produce weeds, but it gave our garden a clean look.
9. Stickers: We couldn't find any "messages" small enough for our garden, but when I spotted these "Believe, Joy, Faith, Imagine" stickers, in the $1.00 bins at Michael's Craft Store, I knew I had to have them!!!
10,11,12. Mailbox, Pond, and Picket Fence: Cute accent pieces to go along with the look of our garden. All three pieces were purchased from A.C. Moore. I love their "miniatures" section at A.C. Moore. You can really go overboard with your imagination, when it comes to miniatures, if you want to.
13. Fairy: What good is a fairy garden without a fairy. We found our sweet fairy at A.C. Moore. I just love her backside. Her bare feet are so adorable.
14. Moss: Moss. This is a MUST HAVE to help create that REAL-look. I found this bag of moss at Michael's Craft Store. I belive it was $7.99.
15. Flowers: More accent pieces. Found at Michael's Craft Stores.
16. Gnome: Lilah was really into the gnomes. She had to have them all! Lol. This cute guy was found at Michael's Crafts Stores.
17. Live Plants: I just picked out some color-coordinating plants that would go great in FULL SUN. I love them. I got one tall and one short. I love the height the yellow flowers give the fairy/gnome garden. We got these at Lowes Home Improvement.
On Tuesday, we got to work assembling our fairy/gnome garden. It was a beautiful day. We layed out a blanket, on the back porch, and got to work.
I helped, but again, I let Lilah do the majority of the work because I knew this wouldn't take LONG to create. I wanted the project to take longer then the shopping.
After planting the flowers, I laid the weed barrier down. Tada!
Next, lay start covering the weed barrier with moss. Can you tell how serious Liley was about decorating our garden?
NOW the fun part begins. Start placement of the home, figures, and accent pieces.
Lilah carefully considered where she wanted everything. I was proud of her creation. We chose to use the "imagine" sticker and placed it on top of the gnome's house.
 I am just in love with the end result. It was a great bonding experience of Lilah and I. Warning: this project is NOT cheap. You can definitely try and use things around your house or make your own homes or accent pieces, but you know me... when I do something, I try to do it to the fullest potential. I am anxious to create a beach fairy/gnome scene. Stay tuned... Hehe. This is kind of addicting.
Now, enjoy some close ups photos of our garden!
Our photographer gnome is taking some great shots of our darling fairy.
I wonder if their home gets fun mail or ALL bills. We are going to pretend that they just receive tooth fairy letters.
I think Lilah and I need to make this a Summer tradition for sure!
I hope Lilah will spend some time, out on the deck, pretending and playing with our garden!! If not, maybe I will. LOL! I think this is definitely one of my favorite projects to date.


Latest on Instagram